Wednesday, June 22, 2011

Brilliant Lighting Book: Light for Visual Artsits by Richard Yot

Light for Visual Artists by Richard Yot

A few weeks ago I finally received my copy of Light for Visual Artists by Richard Yot. I wasn't really sure what to think of this book, as it wasn't squarely aimed at 3D artists, but is a bit more of a general reference.

It really is a marvelous book for 3D artists. Although it doesn't hold your hand and show you how to create each effect in 3D, it's a great resource listing many types of light and examples of each.

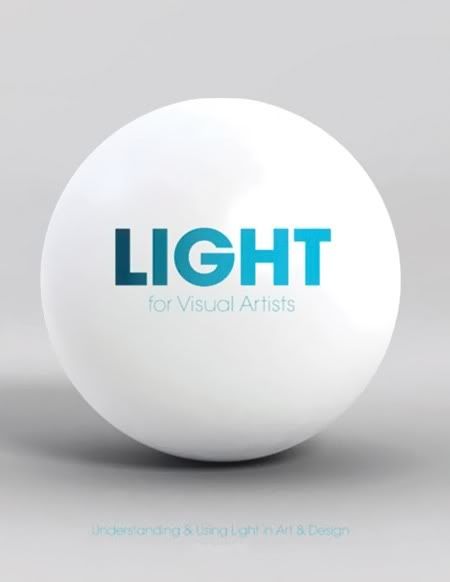
It covers basic studio lighting setups, outdoor and indoor light, natural light, various shadow properties, the way light reacts to different types of materials like chrome and translucent objects, colour bleeding and everything in between. I especially love the way each type of lighting discussed comes with the same picture of a white ball on a white background, so you can compare with other chapters and study the differences.

Although many of the subjects covered are not new, and anyone who has studied light in a decent capacity will probably know most of the contents, this book still has fantastic value as a reference tool, a cheat sheet for whatever you're working on.

I'm very impressed and would recommend this to anyone interested in lighting, both in 3D, 2D, and even film/photography.

Here's a link to the Publisher's website where you can see some example pages and a chapter list, and a link to Richard Yot's website where he's got a lot of great content under the tutorials section.

Tuesday, June 21, 2011

An Introduction to the Facing Ratio Property.

This is probably an old trick, but it can be a bit confusing how to hook it up, so I thought I'd pop a brief outline on here.

The Facing Ratio trick is a great way to simulate lots of things where a lighter colour is required around edges. It's good for making glass, velvet, car paint and fake subsurface scattering out of standard Maya shaders, and I'm sure there are other uses for it too.

I'm just going to give you the basics of how to hook this up.

You need a sampler info node from the Utilities rollout in your hypershade, and a ramp texture.

It's all really simple, middle mouse drag the sampler info node in your work area to the ramp texture node.

A menu will appear, asking how you want to connect the nodes, just click other. The connection editor will pop up, and you want to click facingRatio on the left and connect it to uCoord or vCoord (expand the uvCoord rollout) depending on how your ramp is set up (vCoord for a V Ramp, uCoord for a U Ramp, doesn't matter which way you do it).

This will now place the top colour of your ramp facing the camera, and the bottom colour just around the edges facing sideways from the camera.


From here you can plug it into anything you like, Incandescence and colour works well for velvet, but play around with it and see how you go. It can probably be used in conjunction with mia shaders for some cool effects too.

Don't forget you can map each selected colour in your ramp with other nodes!

Friday, June 17, 2011

Our Film "Keeping Station" is Live!

Finally our 48hour film, Keeping Station, is live and available for you all to watch.

It was all done with paper puppets, after effects sets and a bit of 3D here and there.

We’re proud of the style on this one! Next year we'll work harder to get the story across.


Toowit Toowoo Intro from Toowit Toowoo on Vimeo.

Tuesday, June 14, 2011

sIBL: Fast, Free and Fabulous-looking Image Based Lighting

Today it's my birthday, and what better way to celebrate it than to give you all a present!

I found this neat little program/script/plugin for 3D applications called sIBL.

Image based lighting is a great way to integrate your 3D models into a real-world photo and create a realistic lighting environment for your CG work. Unfortunately, while it’s not hard to set up (in Maya at least), neither is it easy to get it looking great while still rendering very quickly.

sIBL is an external tool, independent of any 3D software which creates fast and splendid looking scripts for various 3D packages to encorporate image based lighting. Best of all, it’s absolutely free.

The team at HDR Labs also have a big library of free HDRIs tailored for use with sIBL that are easy to use and look fantastic.

I had a brief play with it for our paper puppet film, Keeping Station, and it worked perfectly. So at the risk of sounding like their marketing department is paying me, check it out!

Monday, June 13, 2011

A Quick Tip for Faces

Today I wanted to share something that one of my workmates showed me. Whether you’re doing 2D or 3D art, faces are really important to get looking right. We stare at them every day of our lives and we notice when they look a little bit off.

Dean made a great observation about hue shifts through the face. Due to the way blood vessels are grouped, colours are different in various areas. The bottom jaw and lip area takes a slightly bluish tinge, the nose and cheekbones a pinky red tone, and the forehead (being mostly bone) is slightly yellower.

Here’s a quick paintover to illustrate my point. This is one of my older characters. On the left, she’s been painted in a standard way with a skin shader. On the right, I’ve overlaid a slight hue shift through her face, which instantly gives a lot more life and volume to it. It’s probably a bit strong but I wanted to make it easier to see.

Try it out with your own work and see how you go!

Coloration Difference